Pack up your horned helmets - we're off to the Viking Age to play SAGA!
 |
| Bagsie I get to play Kirk |
We sail at fight light!
It's All-Skype Fight Night!
Then may the crabs be cursed by Odin! 'Tis I, Kraken, in a disappointingly restrained plain font.
And I, Stylus shall be as bold as Canute 'Canutie-Pie' Canutesson, the most demure of all Anglo-Dane kings.
Armies:
Anglo Danes
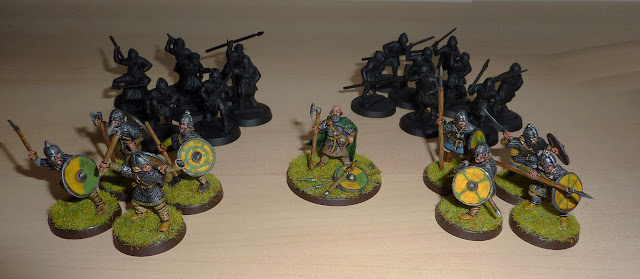 |
| Please don't think the warriors at the back have been lazily primed - it's a complicated silhouette filter on my camera. |
- 1 x Warlord
(supposed to have a Dane-Axe, but I forgot to apply the rules, so I guess he left his back at the béorsele) - 4 x Huscarls
- 4 x Huscarls with Dane Axes
- 8 x Ceorls
- 8 x Ceorls
The last time we played SAGA I actually tried a combined unit of Huscarls, and it worked out pretty well for me in demolishing the opposition.
However, I was rusty on the rules (actually I was rusty on how wonderfully simple the rules were - I kept flicking through the book, looking for statlines that weren't necessary). So I went with the bog standard: two units of Hearthguard (one with special weapons) and two units of Warriors.
Vikings
These are Radiohead Vikings - no alarms and no surprises.
A very plain list, without even the fragile terror of the Beserkers. I did toy with two options available to me - I could have split the Bondi units differently, as a 12/4 split, or I could have taken one of the optional Warlord types (Priests work with a Viking ethic. Troubadours, though? Not sure. Have to be a Skald). In the end, I decide that it's been too long since our last game and I don't want any confusing rules to wrestle with.
Deployment
With a vague grasp on how things work, we decided to try one of the scenario battles (rather than trying to knock out each other's warlord - I think the combative Vikings have the edge in that one).
This one is 'Sacred Ground' and it's a beauty.
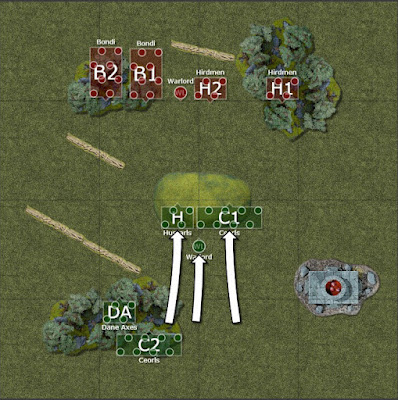
- You set up the battlefield with three pieces of 'sacred' terrain - one outside each deployment zone (the bottom-left and top-right forests) and a hill in the centre.
- At the end of your opponent's turn, you score victory points for every unit that is occupying any of this terrain (3 for a warlord, 1 for each hearthguard, 1 for every two warriors).
- These points are cumulative, and at the end of eight turns, the player who has scored the most is the winner.
So you're faced with the task of grabbing their pieces or terrain, holding them against attack and pushing the enemy off them. The fact that you don't scored until your opponent's turn is key, as it means you can't just rush everything and hope for a big score.
(I realise now that we set up the forests too close to the deployment zones - the warbands should not just be able to camp out in there from the start. Luckily both Kraken and I were up for a scrap, so approached this as a 'capture the hill' mission)
I was deploying second (you take turns, just like you would in WFB). I didn't really have a big plan in advance, so I was quite pleased to be able to react to Stylus's troops. I more or less mirrored them, but I decided to keep a high-scoring unit of Hirdmen in reserve, scoring the wood, and then rush the centre with everyone else.
So my Warlord and his troops set up to do just that. Most of the Vikings' abilities centre around combat, both getting them there fast and then hitting very hard. Lucky that coincides with my plan, really.
The Game
Anglo-Danes - Turn 1
I won the first turn, and so was faced with the decision of who should stay and who should go. A big force could secure me the hill, but would fatigue themselves getting there in one turn, and might miss out on scoring big in the early rounds.
I ended up leaving my Dane Axes and one unit of Ceorls in the scoring forest, and using my Warlord and activation dice to push the Huscarls and other Ceorls onto the hill (they just about reached the slopes with minimal fatigue).
I think I also held back one dice, which I could use to neutralise one of the Viking's activations, just to muck up their advance somewhat.
Viking VPs: 4
Vikings - Turn 1
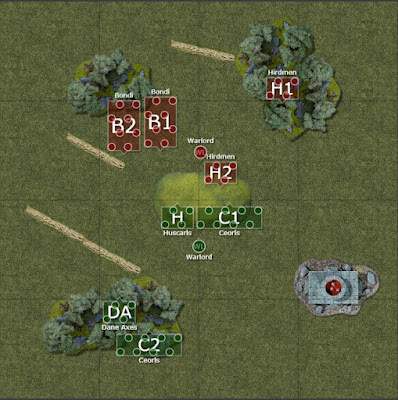
I spread my activation dice out so I could romp my big pack of men forward as much as possible. Your Warlord always gets a free turn, and can encourage a nearby unit to take a free turn too, so I send the men of the Hird with him, then pushed them ahead with a second activation.
(You can use the same unit twice in SAGA, but every use after the first gets them Fatigue points, as does getting into combat. Not only can your enemy use these for advantages, but if you get too many, you can't use the unit at all until it rests!)
I saved dice on one of my abilities - Njord, which lets my Warlord remove fatigue from himself and nearby allies. The damned Anglo-Danes were already all over the hill, and might come charging at me. And worse, lots of their abilities centre around slapping extra fatigue on the foe, so I was prepared.
I'd have to be - all of Stylus's troops were in scoring position, so he was racking up an early lead.
Anglo-Dane VPs: 19
Anglo-Danes - Turn 2
A nice fat VP score puts me in the driving seat, so I spend this turn consolidating. I use my activation dice to fatigue three units of Viking (particularly the Hirdmen in the woods, who are out of range of the Warlord's fatigue-cancelling abilities).
I then spend the remainder of dice to rest my troops - leaving me fresh as daisies to face the Viking onslaught.
Viking VPs: 8
I then spend the remainder of dice to rest my troops - leaving me fresh as daisies to face the Viking onslaught.
Viking VPs: 8
Vikings - Turn 2
Sticking to the plan, we all yomped forwards except the reserves. I had enough dice to send my Warlord's Hird slamming forward into the nearest Ceorl unit, confident that I could push them away.
Nope - they formed a shieldwall, using one of their battleboard abilities, and then played a very defensive turn of combat. My Hirdmen bounced off! Luckily, I had enough dice to send them in a second time. The Ceorls were already tired, and this time they broke away. I took casualties, though, and the Hirdmen were pretty puffed after all that running. I used the Warlord's free activation to pull them back a bit, away from a potential counterattack, but that tired them out even more!
Still, I stopped the Anglo-Danes from getting all their VPs this time, even if my hold on the hill looked a bit shaky.
Anglo-Dane VPs: 11
Anglo-Danes - Turn 3
So my Ceorls are off the hill, but I think I was lucky to survive with five of them left (emphasising defence helped). I get a good roll on the activation dice, getting enough helmets (the rarest dice facing) to add more fatigue to the Viking units.
This pushes the nearest unit of Hirdmen up to their limit of fatigue, which means I can activate the 'Exhaustion' ability that removes two more Hirdmen. So the Vikings' best unit on the hill suddenly looks a lot less formidable (as well as removing a source of VPs).
Arg! Stop bleeding out, you stupid warriors!
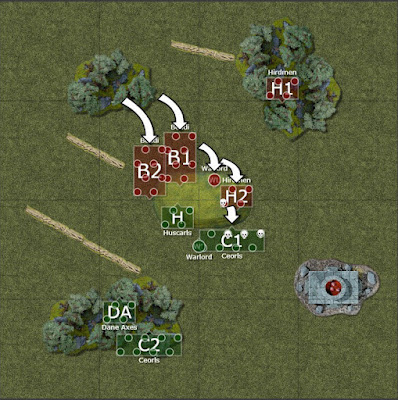
My Warlord then pushes his Huscarls into the nearest unit of Bondi. I think the Warlord whiffs most of his attacks, but the Huscarls do better at exploiting the fatigue-weakened Bondi and I kill five and shove them off the hill.
All in all, a very good turn for me.
Viking VPs: 12
Vikings - Turn 3
I got a good round of dice, that let me plan a counterstrike with my battered Bondmen.
Sending the remaining three in, I activated a couple of abilities to get me extra combat dice. Chief amongst these was Valhalla, which lets me burn men to get great fistfulls of bonus hitting power. I killed off two of the remaining men, leaving just one, but he did the job - dying the in process, but wiping out the enemy Huscarls.

VALLLL HALLLLL AAAAAAAAA
Everyone else uses this fine display of Viking prowess to get a bit of shuteye, getting rid of some of the fatigue they've picked up.
Anglo-Dane VPs: 11
I got a good round of dice, that let me plan a counterstrike with my battered Bondmen.
Sending the remaining three in, I activated a couple of abilities to get me extra combat dice. Chief amongst these was Valhalla, which lets me burn men to get great fistfulls of bonus hitting power. I killed off two of the remaining men, leaving just one, but he did the job - dying the in process, but wiping out the enemy Huscarls.
 |
| VALLLL HALLLLL AAAAAAAAA |
Everyone else uses this fine display of Viking prowess to get a bit of shuteye, getting rid of some of the fatigue they've picked up.
Anglo-Dane VPs: 11
Anglo-Danes - Turn 4
Well, that was brutal. While they set out extra place settings in Valhalla, I use my activation dice to buff up my half-strength Ceorls and the Warlord leads them into the fresh unit of Bondi.
Combat goes very well, and all eight of them are killed in a single turn, for the loss of only a couple of Ceorls.
I'm feeling good about my position on the hill now, so I use my last activation die to bring the unit of Dane Axes up as reinforcements. It's slow going through the forest, but that's no bad thing, as it means they remain within it to rack up VPs.
Viking VPs: 8
Vikings - Turn 4
Hmm. Looking a bit Ango-Dane up here on this hill - can't have that.
My chaps have a quick rest, then I use a couple of fatigue-removing abilities before the Warlord drags the remaining Hirdman into combat with the Ceorls. They win easily, but because there's so much fatigue left on them I haven't been able to get rid of it all. This lets the Ceorls knock the Hirdman's armour down a bit, so he dies in the fight.
The Anglo-Danes are still racking up VPs, though, they've got a lot more in reserve than me. Right now, though, our two warlords are staring each other down on the hilltop - both a little tired, both a little angry, and both bound by the same rules of honourable combat...
 |
| I'm giving you a hard stare, Anglo-Dane Warlord. How will you respond? |
Anglo-Dane VPs: 11
Anglo-Danes - Turn 5
Just the Warlords on the hill now, and there is a characterful rule that states if a warlord can charge another one, he must do so if activated.I contemplate just resting my Warlord and bringing up the Dane Axes cautiously, but I can hear the Viking taunts all the way from Sweden, so I push them forward into the attack.
It turns out my caution was right: my forces are carrying too much fatigue to break through the Warlord's defences, and we are repulsed for the loss of one Dane Axe (who I think may have taken the blow on behalf of his warlord).
Viking VPs: 7
Vikings - Turn 5
Oh. That's not so good. I'm running a bit low on dice (the number you get is dependent on how many units you have), and I can't activate my Warlord without him having to get stuck into a fight again. Hitting the enemy Warlord is my only option, but I'm very unlikely to take him down as he's just as tough as I am.
In the result, I manage to kill him! Oh no, no I don't - he can splash wounds on to nearby soldiers, so I merely kill a lone Dane Axeman, and then bounce off.
Anglo-Dane VPs: 5
Anglo-Danes - Turn 6
Damn it, that Viking Warlord is still holding the hill by himself. I'd be impressed by the cinematic heroism, but I need him dead if I want to wrap up this victory.
I use an activation dice to turn the Viking Warlord's own fatigue into extra attacks for me (thanks to Kraken for pointing out I could use this ability, then spend his fatigue to reduce his armour) - essentially make it very unlikely that he'll live through the storm of axes.
Sure enough, the Viking Warlord gets chopped down many times over, although not before dragging the two remaining Dane Axes across Bifrost with him.
Viking VPs: 4
Vikings - Turn 6
Well, with a single dice left to me, there's not a lot I can manage. And this last unit of Hirdmen is nearly exhausted (presumably a bit discouraged after watching all their chums die). I rest them as best as I can, and prepare to lose in battle, as there's no way I'm going to catch up with the Anglo-Dane VP lead now.
Anglo-Dane VPs: 3
Anglo-Danes - Turn 7
This victory is pretty much in the bag now - the only remaining Hirdmen are too fatigued to be much of a threat to me, and I have enough activation dice to keep them that way.
If the game was playing longer, I reckon I'd have little trouble eliminating them. As it is, I'm way ahead on points, so I just pound them with fatigue to make them stay put.
Viking VPs: 4
If the game was playing longer, I reckon I'd have little trouble eliminating them. As it is, I'm way ahead on points, so I just pound them with fatigue to make them stay put.
Viking VPs: 4
Vikings - Turn 7
Anglo-Danes - Turn 8
Nothing much to do here but rest up my guys, fatigue the enemy, and hear the lamentations of their women.
Viking VPs: 4
Viking VPs: 4
Vikings - Turn 8
Hah! Joke's on you, we don't have any women here. Just a pack of the North's finest viking warriors, Hirdmen bred and born for battle. Who have spend the entire fight resting gently in a copse of trees. Just what kind of vikings did I bring with me here?
 |
| Historically Acccurate ones, that's what. |
Anglo-Dane VPs: 7
The Results
Anglo-Danes win: 74:51
Locker Room Chat
What a game - and from my limited exposure to SAGA, our best yet. For the first time, we had different victory conditions than just slaughter, and that led to some interesting tactics and outcomes.
Yeah, good stuff! It also took around an hour and a half tops. Quick system - we reckon you can probably fight a small campaign in a single evening, and fully intend to do so in the future at some point.
Kraken was very bold to move so much of his warband against me (and thereby deny them scoring opportunities in their own zone), but since I went first, I guess the pressure was on him to get to the hill and push me off. It would be interesting to have all three scoring objectives in the centre ground, to see what difference that made.
I should have been bolder, actually. If I'd split my Bondi 4/12, left the 12 back in the woods as a scoreboard, and taken both Hirdmen units in for that central fight. I left some behind as I thought they'd be a more reliable scoring unit, but actually they're exactly the same as 8 Bondi as well as being much better in a fight. Silly, that.
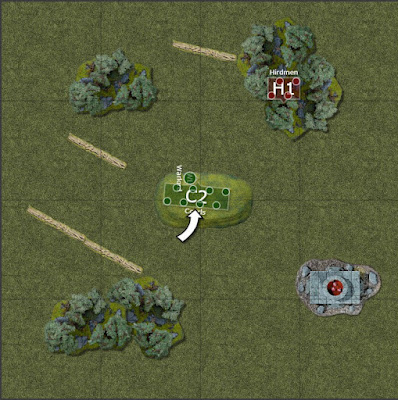
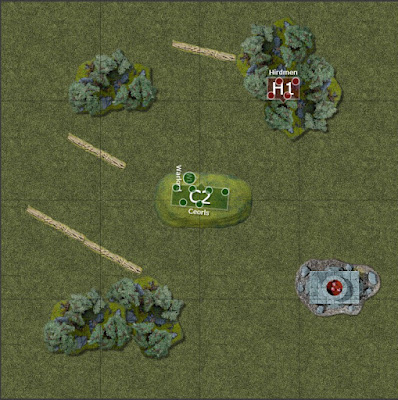
Looking at the battle maps, it may seem like this battle was a case of running everyone into the centre and letting them mix it up. I guess the real subtly and tactics come from the activation dice and how they are used, plus fatigue (if we report future battles, I may find a way to depict them, as that's where the battles are won and lost).
There's still so much to learn about the Battle Boards. The Anglo-Dane's ability to inflict fatigue on enemy forces helped me to hold the hill against superior numbers, but the Vikings can be ridiculously killy. I'm not even sure they need the Berserkers, as regular forces can be augmented to the same effect.
They can also soak missile damage, and actually thrive on a moderate amount of Fatigue, as they can convert it into combat potential. Berserkers work well as a way of taking the heat off the rest of the team, as opponents tend to focus on hard-hitting yet fragile units. In a game this size, though, you're just throwing dice away.
So the Anglo-Danes will be drinking warm Ribena from the skulls of their enemies - for tonight we are victorious! Olicrosse!
While we'll be taking the long trip to Helheim and sucking curdled goatsmilk from a communal pail. Sorg ok dómr!







No comments:
Post a Comment